


Do you have too many photos gathered on your Windows 10/11 computer and you want to sort them out in an easy way? Well, the first thing you need to do is to remove all duplicate photos from your PC. Because duplicate photos will take up your disk space.
Windows 10/11 does not directly provide tools to find or clean up duplicate images. However, users can use the built-in File Explorer and Photos app to get rid of duplicate pictures, which can take a lot of time. In this article, 3 Tricks can help you to find and delete duplicate photos on Windows 10/11.
Trick 1: Use Microsoft Photos App to delete duplicate photos
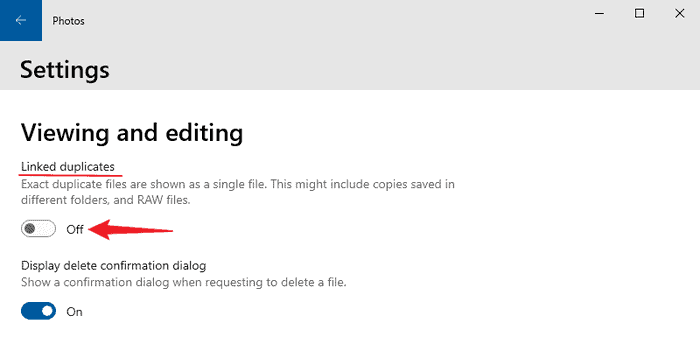
Microsoft Photos is a photo viewer and manager app included in Windows 8, 8.1, 10 and 11. To find duplicate photos in Microsoft Photos, you first need to turn off the Linked duplicates option. This option is enabled by default and hides duplicate pictures, if there are any, aiming to provide a good photo browsing experience. You just need to access “Settings” in Microsoft Photos and toggle “Linked duplicates” to “Off.” Then you can start finding and deleting duplicate photos.

Step 1: Open Microsoft Photos on your Windows 10 or 11 PC. Select the “Collection” tab. Browse through your photos and find duplicates by comparing photos.
Step 2: Select multiple duplicate photos and click the trash can icon at the top right of the window.
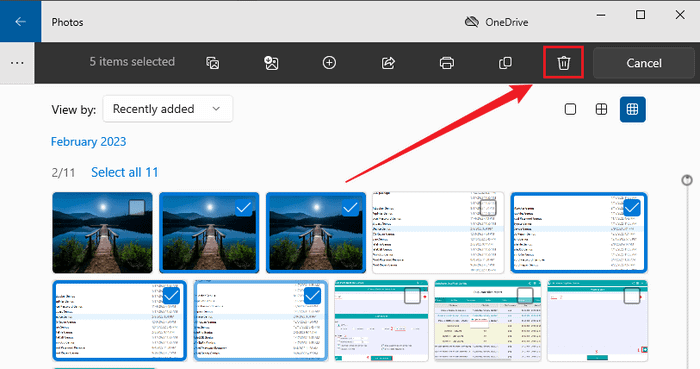

Step 3: In the Delete, these files dialog box that appears, click Delete to confirm the deletion of the selected duplicate photos.
Note: Deleted photos will be stored in the Recycle Bin, and you can choose to empty the Recycle Bin.


Trick 2: Use File Explorer to delete duplicate photos
Although File Explorer can not handle duplicate photos, some tricks can make it easy to delete duplicate photos from your computer using File Explorer. However, the process can be time-consuming.
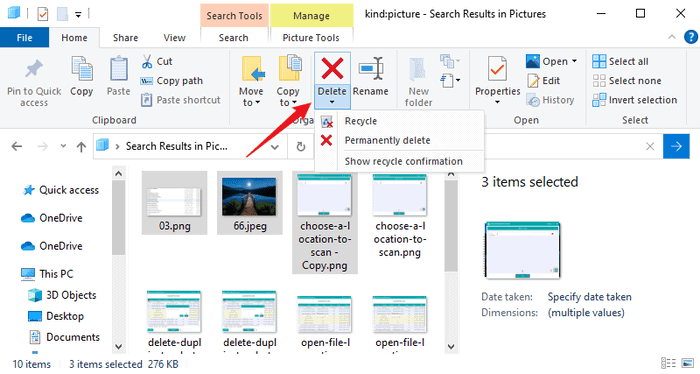
Step 1: Use the WIN+E keys to open File Explorer. Open a folder where you have many duplicate photos, for example, the Pictures folder.
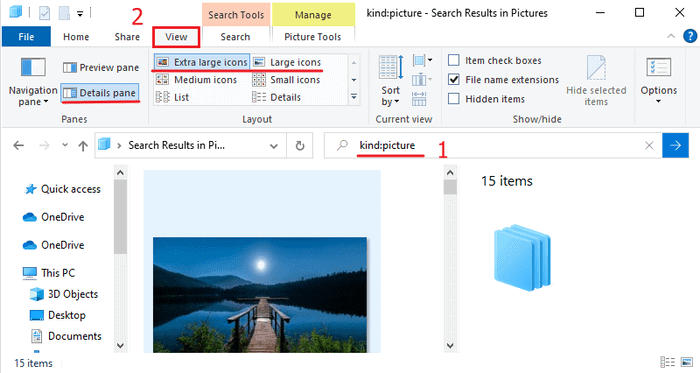
Step 2: Type ” kind:picture” in the search box, and this will show all photos in that folder, including those in subfolders (if any). You also can specify the picture format as needed. For instance, entering “kind:=picture type:png” will display all PNG photos. Then move to the View tab in the top ribbon and click on the Extra large icons or Large icons option. Also, click on the Details pane option.

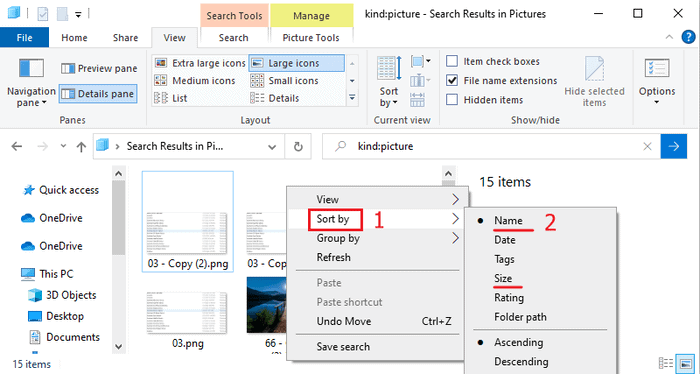
Step 3: Right-click in the margin, then click on the “Sort by” drop-down menu and select “Name or Size.”

Step 4: Browse through the displayed photos and identify duplicates by previewing and comparing photos. Press the Ctrl key to select multiple duplicate photos. Then you can move to “Home” on the top ribbon, click the Delete button, and you can choose to Recycle or Permanently delete.
Extra tip: When you search for duplicate photos in your Windows 10/11 PC, please avoid searching system folders such as Program Files, Windows, and PerfLogs. Even if these folders have duplicate pictures, it is not secure to delete these duplicates.
Trick 3: Use the Best Duplicate Photos Finder – iSunshare DupFiles Genius
iSunshare DupFiles Genius is an awesome software to detect duplicate files on your Windows 10 /11 PC. It comes with the following highlighted features:
Scan any type of file, including pictures, videos, archives, documents, etc.
Not only can you scan folders on your Windows computer but also on external storage devices.
Customize your scan settings to get a specific report.
Locate the duplicate photos to check details on your Windows PC directly.
Free up space previously occupied by duplicate photos, delete duplicate photos, and unclutter your system for faster, smoother performance.
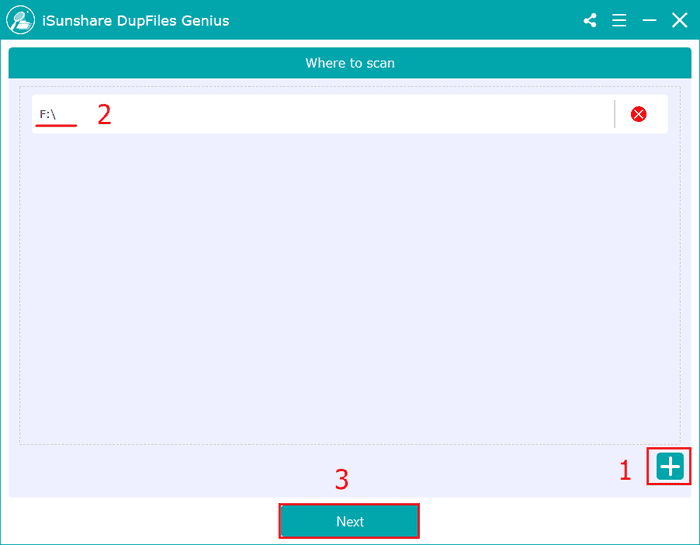
Step 1: Download and install this professional-grade photo finder on your Windows computer.
Step 2: Click the Add button in the bottom right corner of the main screen of the software, select the disk or certain folders containing the duplicate photos from your Windows 10/11 PC, and click Next to continue.

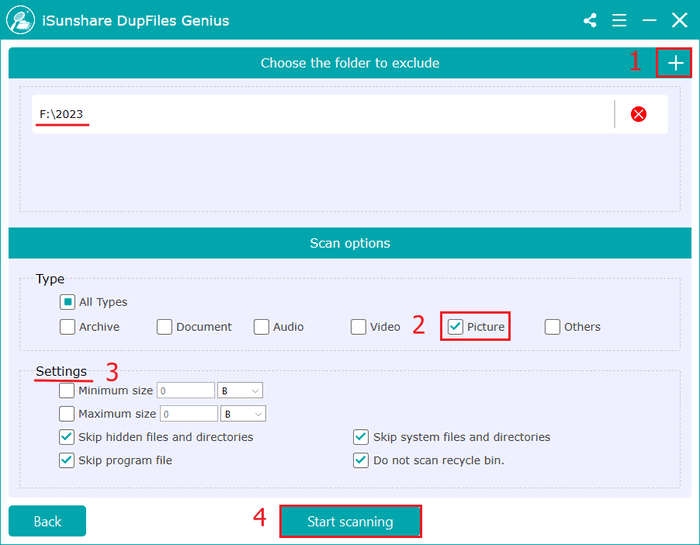
Step 3: You can set the parameters to save your scanning time. For example, click the Add button to select the folders excluded from scanning, then check only the Picture option, set the maximum and minimum size of the pictures to be scanned, check the skip system files and hidden files, etc. After you have finished setting the scanning parameters, click the Start scanning button.
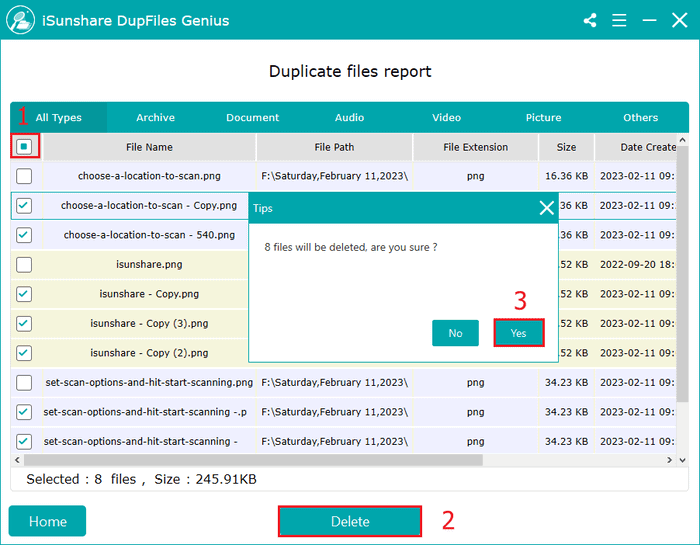
Step 4: DupFiles Genius will list a duplicate file report based on your scan settings. You can right-click on the file and click Open file location to view the details of the photos.
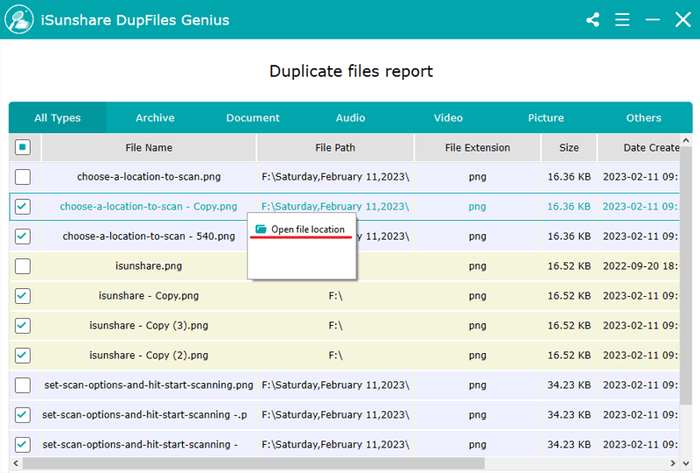

Step 5: If you have purchased the full version of the software, you can simply check the box in front of the File Name, click the Delete button, and click Yes in the pop-up box to delete these duplicate photos with one click. If you are using the free version, you can only delete one duplicate photo at a time.
FAQs:
- Why do duplicate photos appear on Windows 10/11?
When you use your Windows computer for years, you create duplicate useless files such as duplicate photos, PDFs or Office files. These duplicate files take up a lot of storage space and need to be optimized manually. When the storage space of Win10/11 is full, Windows PC will become slow and may even blue screen jam, so users should clean up the duplicate files regularly.
- Why do you need to find and delete duplicate photos?
Useless duplicate photos can waste a lot of disk space and further affect the performance of your Windows PC.
- Should I delete all duplicate photos on Windows?
Some duplicate files can be necessary for your operating system or certain apps to function properly. You’d better leave them untouched. You can scan folders like pictures and downloads. If you want to scan your entire drive for duplicate photos, do exclude system folders and files. iSunshare DupFiles Genius can help you do just that.

