


Do you use Google as your primary browser? It’s famous worldwide for its security and advanced integration features. Google’s free email service, Gmail, has numerous advantages like huge storage space, data security, etc. However, its extra features make it easier to manage files in your inbox—for example, labels.
You should know how to create labels in Gmail because doing so makes it easier for you to manage your tags and categorize them as per your requirements. Creating a filter based on those labels ensures that Google automatically sends emails to their respective labels.
You might have used a labeled message in the past to distinguish it from the others. But if you haven’t, here are some things to help you with that, including the process for creating labels in this email service.


Why should you create labels?
As mentioned above, creating labels has a lot of benefits. Most of all, it is a helpful tool for keeping your inbox organized and neat. Most email services have a folder system, which is also efficient but has limited functionality. For example, you can only use a single folder for an email.
With labels, you can store an email in more than one place. You could add various tags to a single mail, ensuring that it exists under multiple categories, making it easier to find when required. When you need to find Gmail, it is easy to do so by clicking one of the labels from the left panel.
Process for creating a label
Creating a label in Gmail is straightforward and involves just a few steps.
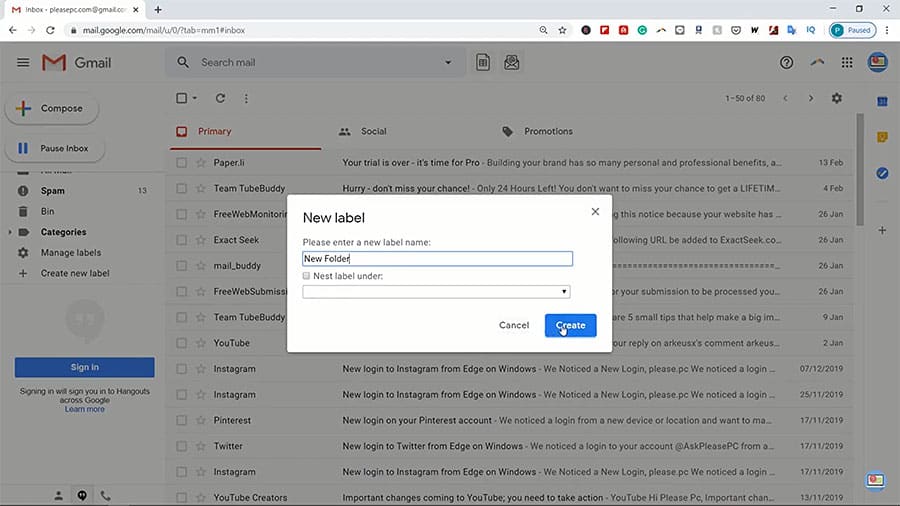
Whether the Gmail you use is the desktop or mobile version, click on the “more” section on the left. Scroll until you reach the “create new label” below the “manage labels” section.
Upon clicking that section, you will receive a notification box asking you to give the label a particular name. You can name it any way you want.
Click Create to complete the process.
Gmail will now store your email under that label. However, to ensure that Gmail automatically sends all emails to that label through an automated process, you should create a filter.

How to create a filter?
To create a filter for your labels in Gmail, select a particular mail and click on the three horizontal dots above. Clicking on the dots causes a drop-down menu to appear on the screen.
Choose “filter messages as these.” Click on create a filter, after which a new screen appears with numerous sections like skip the inbox, mark as read, etc. Select the new label, and then click create a filter. Gmail will automatically sort your emails according to the ones you have made.
Organizing your files automatically
Besides creating labels and files in Gmail, there are other ways of organizing your work automatically. For instance, you could hire a company specializing in automated digital filing cabinets, which gives you easy access to your files and email attachments directly from your inbox through an extension embedded in Gmail.
You can also customize auto-filing AI to place files wherever you want and share those with clients quickly.
You should know how to create labels in Gmail, which makes organizing your mail easier, regardless of whether they are inbox or sent messages. It is a better option than folders and declutters your Gmail inbox.

